Story Mode
Story is where you author the talk — organizing your narrative into acts and scenes, each one controlling what the audience sees, what's animated, how the diagram is framed, and what you say.
The data model
Every project contains an ordered list of Acts. Each act contains an ordered list of Scenes. A scene is a sparse override layer — it only stores what differs from the base diagram. Anything not mentioned in a scene falls back to the diagram's own state (all elements visible, no emphasis, no animations).
Project
 └── Act  (e.g. "Read path")
      └── Scene  (e.g. "Incoming request")
           ├── visibility   which elements are hidden / shown
           ├── spotlight    which elements are lit, the rest dimmed
           ├── animations   flow / accent / reveal
           ├── camera       optional saved zoom + pan
           ├── annotations  saved drawing marks
           └── script       speaker notes (presenter only)
The Storyboard
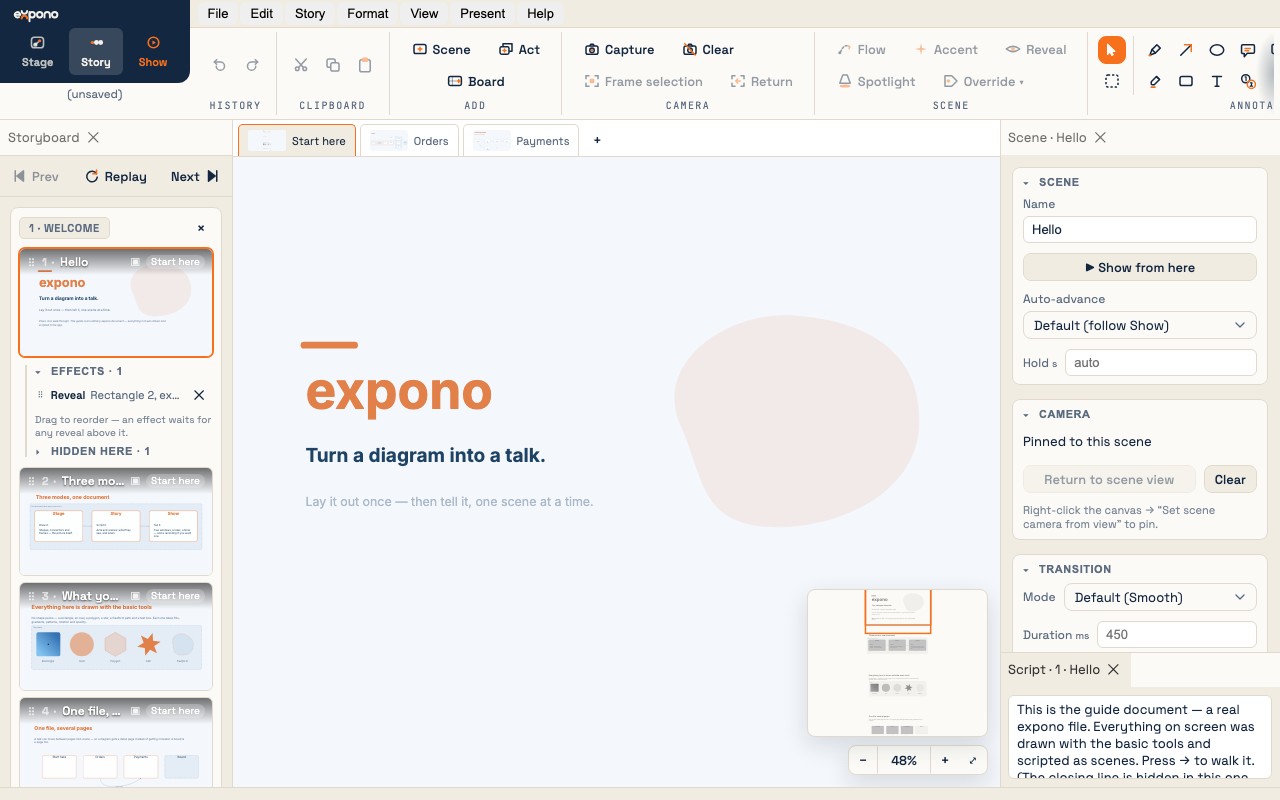
The left panel in Story mode shows the Storyboard — all acts with their scenes as live 16:9 thumbnails. Each thumbnail is a real rendering of that scene's state; it updates as you edit.
- Click a scene thumbnail to select that scene on the canvas.
- The current scene has an accent-colored border.
- A camera pin icon (▣) in the corner means the scene has a pinned camera framing.
- Scene and Act in the ribbon's Add group append a scene after the current one, or start a new act; Board adds a blank page to draw on mid-talk.
- Under a card, the scene's effects are listed in play order — drag to reorder — with what the scene hides.
- Drag scene cards to reorder within an act.
Acts
An act is a named path through the diagram — the "chapter" level of your talk. Examples: Read path, Write path, Error case, Approved branch.
Act properties
| Property | Purpose |
|---|---|
| Name | Displayed in the Storyboard header and the presenter's act selector. |
| Default visibility | Sets which elements are hidden by default across all scenes in this act. Elements not listed here start visible. Use this to hide elements that should be "revealed" progressively across scenes. |
| Scene count | Shown as a chip. Acts can have as few as one scene. |
Default visibility
The most powerful per-act setting. If you want an element to appear "introduced" at scene 3, put it in the act's defaultVisibility → hidden list. Scene 3 then explicitly shows it. Earlier scenes don't need to mention it at all.
Scenes
A scene is a moment in the talk — what the audience sees, what's animating, and what you say while the presentation is paused on that step.
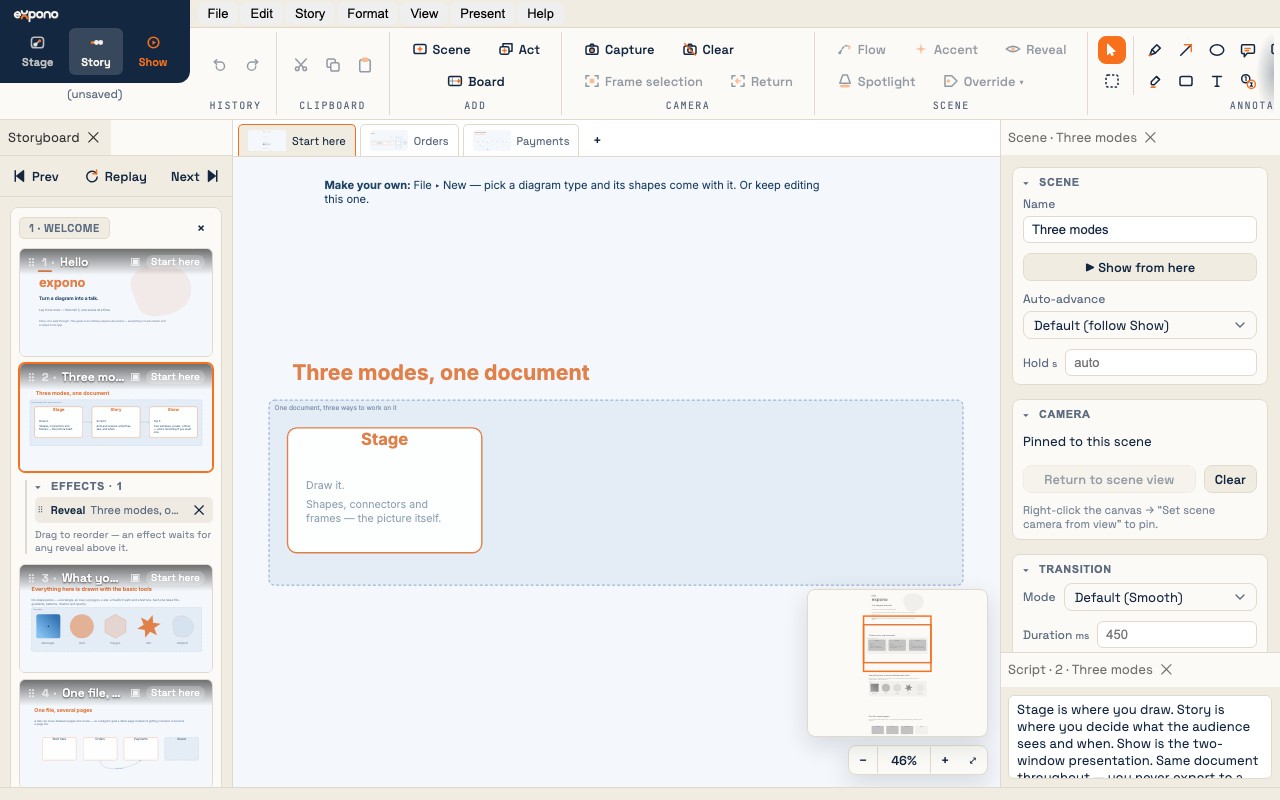
The Scene panel
| Field | Purpose |
|---|---|
| Name | The scene label shown in the Storyboard and presenter scene list. |
| Script | Your speaker notes, in the Script panel — shown in the presenter cockpit, never to the audience. Markdown works. |
| Show from here | Starts the show at this scene, for rehearsing one part. |
| Hold duration | Optional seconds for this scene — the cockpit timer counts it down, and the scene can auto-advance when it ends. |
Visibility overrides
Select any object on the canvas while a scene is selected. The Override panel shows what this scene says about it:
- Visible — force the element shown, even if the act's default hides it.
- Hidden — hide the element for this scene.
- Auto — inherit from the act's default visibility (the default state).
Hiding a frame cascades to its members. Hiding a shape also hides connectors to/from it (unless those connectors are explicitly forced visible).
Spotlight
Select the objects the scene is about and press Spotlight in the ribbon's Scene group: they stay lit and everything else dims. The transition between scenes animates the change. For a looping effect on one object, add an accent.
Camera framing
Each scene can optionally save a pinned camera — a specific zoom and pan position the audience view tweens to on scene entry.
- Select the target scene in the Storyboard.
- Pan and zoom the canvas to the framing you want.
- Press Capture in the ribbon's Camera group. A camera pin (▣) appears on the scene's thumbnail. Frame selection does the same for whatever is selected, without you framing it by hand.
- Clear removes it; Return brings the canvas back to the scene's page and framing after you have wandered.
Scenes without a pinned camera preserve the audience's current framing — the view doesn't jump. This lets you pin only a few key framings and let the audience navigate freely between them.
Scene annotations
Annotations are drawing marks saved into a scene — arrows, boxes, highlights, and text you draw as visual call-outs during authoring (rather than live during the Show). They appear in the audience view exactly as placed.
Drawing annotations
The annotation tools sit at the right of the Story ribbon:
- Pen and Highlight — freehand strokes, thin and thick.
- Arrow, Box, Oval — marks you drag out.
- Text, Note, Callout — words on the canvas; a callout points at something.
- Step — a numbered marker, for “first this, then this”.
- Ink color sets the color for the next mark; Clear removes the scene's marks.
Editing annotations
With Navigate (the Select tool of Story mode) active, saved annotations are selectable and editable:
- Drag to move.
- Drag corner handles to reshape (boxes/ovals) or reposition endpoints (arrows).
- Select one and the Inspector offers its color, its text, and delete.
- Shift/⌘-click to multi-select; Reveal builds a reveal sequence from the selection.
Annotations clear automatically on every scene advance during the live Show (they're replaced by the next scene's saved annotations, or nothing). Scratch annotations you draw live during the Show are discarded on scene advance — they are not saved.
Previewing scenes
You don't need to launch the Show to preview transitions. In Story mode:
- Prev and Next at the top of the Storyboard step through the scenes — the canvas animates each transition. Clicking a card jumps.
- Replay beside them runs the current scene's entry again.
- Show from here in the Scene panel launches the show at this scene.
The Story ribbon
| Group | Controls |
|---|---|
| Add | Scene · Act · Board |
| Camera | Capture · Clear · Frame selection · Return |
| Scene | Flow · Accent · Reveal · Spotlight · Override ▾ — what the selected scene does with the selected objects |
| Annotate | Navigate · Marquee · Pen · Highlight · Arrow · Box · Oval · Text · Note · Step · Callout · Ink color · Clear |